Friday, September 28, 2012

Prima Scrappy Happiness!!!

Here's a fun layout designed by Prima Educator, Jamie Dougherty!  I love her "Live With Prima" classes on Ustream!  Recently, Jamie suggested that we create a layout using her design taught in class.  We were asked to post our finished version on the "Live With Prima" Facebook page by the 30th.


I had so much fun creating this page, especially since I've been anxious to work with gesso and the new stencils that have become so popular again.  Remember the days when we stenciled everything we could get our hands on, ladies?   Have to admit, this is tons of fun and so easy...You really can't make a mistake!  Perfect when you're needing to add a little texture to your project or even mute the pattern on your paper.  To add a little elegance I sprayed the dried gesso with Glimmer Mist in both gold and silver!  I didn't have Prima's Songbird paper line, which was what Jamie used, so I decided to substitute with Prima's Rondelle and a 6x6 paper pad of the Almanac paper line, which happened to be what I had on hand.  I also used Prima Flowers and Trinkets to complete my page.  The adorable ruler pieces are from Maya Road...Aren't they cute!

As always...Thanks so much for stopping by!  Would love to hear from you!!!

Sunday, August 12, 2012

Finding Inspiration From The Unexpected!

What inspires you?  How about a pair of hippie earrings (not pictured here), cheese cloth and a desire to create a Bohemian style layout. My daughter is studying Fashion Design and specializing in Knitwear!  I loved the way her scarf looked with the cheese cloth.  Funny, I remember making the scarf a few years ago...The name of the yarn- Bohemian! :)  Guess I'm not sure how all of these things came together but I'm always happy when it's finally time to create my "off the wall" vision!
By adhering the layout to an Artist Canvas Board, my daughter will be able to place this in an easel or hang it on her wall.  To achieve this look, I simply painted the sides with black acrylic paint, stamped a flourish image with Versa Mark Embossing Ink and dabbed Perfect Pearls in Gold over the ink, gently brushing the excess away. I finished with a spray matte polyurethane sealant.

Prima goodness is all over this page, thanks to my local scrapbook store, Pages In Time / Purses and More!  I was able to grab Prima papers from the Melody, Moulin Rouge and Sparkling Spring Collections.  Other Papers used, FabScraps- Classic Flower & Classic Black Lace, Crate Paper- Restoration Doilies Collection! Additional Supplies- Prima Botanical Notecards, Prima Flowers, leaves & Bling, Prima's Marion Smith's- Vintage Trinket Metal Flowers & Bling Dangles, Petaloo Flowers, Spellbinders Dies, EK Success Punch, Fiskars Punch, Sizzix Flourish Die, Natural Unbleached Cheese Cloth, Black Chain, Brooch and Beaded Dangles made by myself, Corrugated Cardboard, 12x12 Canvas Board, Tim Holtz Distress Inks, Fabulous Flourishes Stamps and Perfect Pearls, Versa Mark Embossing Ink, Tattered Angels Glimmer Mist, Black Acrylic Paint, DecoArt Dazzling Metallics Elegant Finish Paints, Rub'n'buff Ebony, Transparencies with Sentiments made with Photoshop Elements.

As always...Thank you so much for stopping by!  Would love to hear from you!!!

Thursday, July 26, 2012

Scrapping With Transparencies and Canvas!

Don't you love the way photos look printed onto a transparency? Ever thought about using canvas as a background?  How about starting small?  Sound do able?...Completely!  Start with a fav photo, something without tons of intricate detail. Before printing, tell your photo editor to revert image- (simply flips the photo).  I do this so that the ink will be on the underside, once its out of the printer and I've turned it over to it's correct orientation.  This protects my photo so I don't have to worry about the ink getting scratched.  As for the canvas...Couldn't be easier!  I picked up a small covered canvas board at Hobby Lobby.  I then purchased some canvas by the yard at JoAnn Fabrics.  Cut it to size, leaving a small amount to fray the edges until you achieve the desired look.  Apply your fabric canvas to your canvas board using Fabri-tac.  Now decorate!!!

Prima Flowers, Silver Locket- Michaels, Pull Knob- 7 gypsies, Keyhole- Tim Holtz, Bling Button- JoAnn Fabrics, Vintage Seam Binding- Etsy, Flourish Bling- Prima, Crotchet Flower and Beaded Dangle- Made By Me!
Thanks so much for stopping by!  Happy Scrapping!!!

Tuesday, July 24, 2012

My Favorite Vintage Lady Card! :)

Do you have a favorite card or layout?  Something that you've created that you just can't part with?  It's okay, you can admit it! :)  I know, we all have good intentions.  We want to make something special for that special someone and before we know it, we've created a little piece of ourselves, that has found it's home with us!  If you think about it, your artwork is a part of you and should be enjoyed by you and one day by your children.  So next time you're feeling guilty, stop, enjoy your little creation and know that your children might one day be doing the same! 
Background Paper- BMU Shabby Blanc Newsprint Digital, Kraft Cardstock- JoAnns, Book Script Digital Paper (printed and cut out)- Katie Pertiet- Designer Digitals, Diamond Pattern Paper- Websters, Dressform- Dusty Attic, Frame- Tattered Angels, Spools- Maya Road,  Half Back Pearls & Button Trim- Hobby Lobby, Porcelain Roses- Michaels, Vintage Seam Binding- Etsy- Debbie Marcinkiewicz, Vintage Lady Image- Etsy- madebyjanet, Fabric Flower- Prima, Stickpin- made by me!

Thursday, July 19, 2012

Little Darlings Album! Made For Baby Sully!


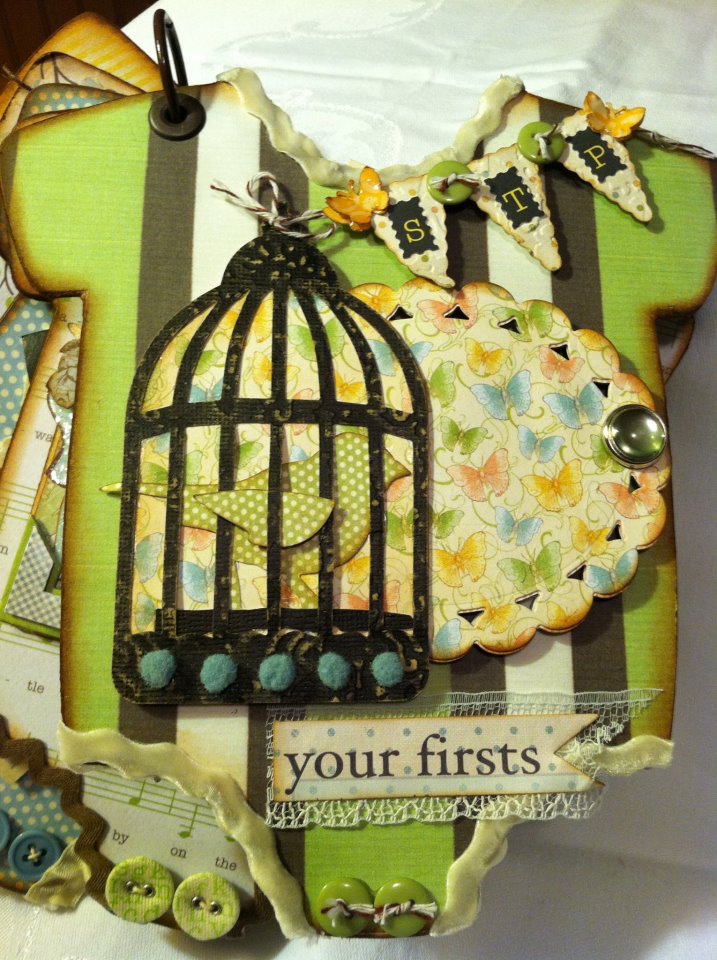
If you're looking for a perfect vintage paper line for either a layout or a mini for a baby...Look no further! G-45 has outdone themselves with their Little Darlings Paper Line! I loved being able to use the paper from the line as well as odds and ends from my stash- both paper and digital, which I was able to print. It all matched perfectly and with enough left over to make a few more minis for all 4 girls!


I cut my Onesie Pattern from my Baby Steps Cricut Cartridge. I then traced my pattern onto med wt. chipboard, cutting them by hand. The patterned paper was cut with the Cricut.  I covered my first piece with a cute little vine pattern by WE R Memory Keepers...Loved how it incorporated all of the colors I'd had in mind for my album! Couldn't resist their dimensional stickers either...They added so much to this album!  I used several Spellbinders dies as well as Stampin up & Martha Stewart  Punches too! I even used some printed digital papers from the SNU Baby Line and BoBunny & October Afternoon Papers from my stash. The Baby Steps Cartridge was fun to play with. I found myself cutting the crib in several layers & embossing it to make it look like a dark wood finish.  Loved the Little Darling Chipboard Pieces & Stickers. The child kneeling in prayer was a Crafty Secrets Vintage Image. Of course, everything vintage must have seam binding! Also used ball trim, twine and ribbon from Hobby Lobby. The wooden frame is from Dusty Attics. Everything is distressed with Tim Holtz Inks! Used some Tim Holtz metals also and my favorite Bird Cage Die!   The Binding was done with the We R Memory Keepers large eyelets in copper and a 7 gypsies med binding ring!  Lastly, the back cover pic was taken while in the NICU. Baby Sully is holding his Daddy's hand. I found the poem and knew it was perfect!
Thanks so much for stopping by!

Wednesday, August 10, 2011

A Man and His Dog.

Hope everyone is having a fabulous week!  We're FINALLY getting a much deserved break from the heat...Thank you!!!

This week's Color Challenge over at CR84FN35 , was to say the least....a bit of a challenge.  I love this color combo (lavender, celery, gray)...It reminds me of the lavender in my flower garden.  I had a difficult time deciding on a theme, once decided, it became more of an emotional challenge...

A few evenings ago, my hubby (the veterinarian) and I, found ourselves chatting about our dog, Katie.  We lost her about 6 years ago.  She was truly my husbands best friend.  I remember the day she died as if it were yesterday.  Hal came home from work, fixed her a bowl of her favorite food and together they spent the last few minutes of her life sitting on the back porch... just the two of them.  Knowing what he had to do, with a tearful goodbye, he put her to sleep...
Papper- BoBunny, Digital Frame- Rhonna Farrer, Prima Flowers, Tim Holtz- Mini Baroque Die, Poem's Author- Unknown, Ribbon- Ben Franklin Too (Ribbon Flowers & According Trim- Handmade, Seam Binding- DebSimpleTreasures Etsy Shop!


Thanks so much for stopping by!  Would love for you to leave a comment!!!

Monday, August 1, 2011

Designing With Crafty Secrets~Creating With Vintage Patterns CD!

I absolutely love Crafty Secrets~Creating With Vintage Patterns CD!  It's a must have if you love vintage patterned paper!  Whether you love creating with paper or you're a digi scrapper, you'll have a blast with all of the possibilities!  My first project with this CD was a card for my youngest daughter's 18th birthday...Can you believe it???  I now have 3 girls in college! :-)
The darling little girl is from the Birds and Blossoms Image Sheet.  She is framed with the Elegant Chipboard Embossed Frame, all from Crafty Secrets!  Just love the little banner, paper from the Vintage Patterns CD!  I stamped it with the Artsy Banner Stamp Set...You guessed it- Crafty Secrets!  The beautiful Seam Binding is from DebSimpleTreasures Etsy Shop.  I've also used a Prima Flower, Spellbinders Grommet Tags Die, Flat Backed Pearls and Lace from Hobby Lobby.  I enjoyed making the little Stick Pin from some beads in my stash...Easy Peasy!  If you haven't tried making a stick pin, you really should! 
Happy Birthday Jodie...Mommy Loves You Bunches!!!

Thanks so much for stopping by!  Would love for you to leave a comment!

Blog Design by Get Polished