Saturday, November 17, 2012

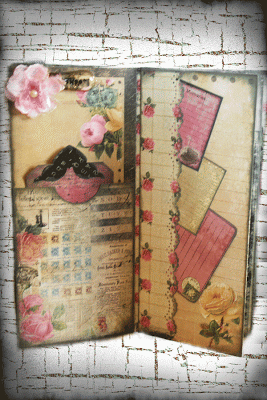
SuPer CuTe, SuPer FaSt MiNi AlBuM!

Do you love the idea of giving gift cards, but wish it felt a bit more personal?  Ever wish you could create a quick little mini album to hold your gift cards, but didn't know where to start?   Prima Educator Stephanie Miller, takes us through the process, step by step!  You won't believe how easy it is!  http://www.ustream.tv/recorded/26433515


Prima's Romance Novel Paper Line Designed By Prima Educator Marion Smith, purchased from my local scrapbook store- Pages In Time/ Purses and More  Lincoln, Nebraska
Marion Smith Digital Printables From http://www.marionsmithdesigns.com
Album Designer- Stephanie Miller Prima Educator http://withagrin.blogspot.com/
Additional Products- Prima's Metal Trinkets, Clock, Flowers & Bling- Romance Novel, Prima's Resist Canvas- colored with Glimmer Mist, Crocheted Ribbon- Hobby Lobby, Paper Punches- Martha Stewart, EK Success & Stampin Up!

I would love to have you join my blog and leave a comment!
As always, thanks so much for stopping by!


Thankful God Has Given Me Another Year To Love My Family!

Almost one year ago, I was hospitalized for complications from Lupus and Scleroderma.  I knew I was very ill but didn't know I was in partial organ failure which held a poor prognosis.  There were four Specialist's taking care of me who all felt I needed surgery ASAP.  Unfortunately, it meant seeing a specialist in another city. At my first appointment I learned that due to the type of disease I had and the fact that my entire organ was diseased, I wasn't even a surgery candidate.  When I asked my new specialist how long I had, he took a piece of scratch paper from his pocket and began drawing a graph of peaks and valleys.  He explained that each flare would be a little worse than the last, and I would never return to feeling as well as I had before, until it was over.  He then looked up at me and said, "I'm very sorry."  I folded the little piece of paper and put it in my purse.  I've looked at it many times since that day, still with many of the same emotions I had then.  My life is different now, just as it is for my family.  When we go to bed at night, my hubby takes my hand and holds it until we fall asleep. He's scared to lose his best friend and the woman that loves him most in the world. Our girls are scared.  I'm sick with very little energy, which requires spending a lot of time in bed. Recently, on one of my bad days, my daughter lay beside me sobbing. It's difficult and so scary  imagining your life without your mom in it, even if you do have three sisters and a daddy who loves you very much.

This year will be a different kind of celebration.  We will celebrate the love we feel for one another.  My daughter, attending college in San Francisco, will be home during the week of Christmas.  Her only request, fewer gifts under the tree (no longer important) and, more "mom time" with less distractions...meaning, any gifts I was planning to make, forget about them, so I can be all hers...NO MORE STRESS! :)  Another daughter wants professional pictures taken of our family, "especially, mom & dad."  Not thinking,  I replied, "Oh Jessie, my steroid face and all those extra pounds!" Her response, "Mom, this is important to all of your daughters and we could care less about your steroid face!!!" My other two daughters haven't put in their request, yet...  It's funny, all these years I worried about the gifts.  Soooooo many gifts under the tree and making sure everything was perfect for them.  My tree was beautiful!  Between what I'd collected and made over the years, it was one of the most gorgeous trees I'd seen.  That all changed, one year ago, when I'd been so ill and in the hospital. The night before I was to be dismissed my two youngest girls stayed up all night putting the tree up and decorating the house.  I walked in to my home and was never so surprised in all my life! The tree had never looked so beautiful!  The branches were a little smooshed and the girls had replaced a few strands of lights, (which didn't match the other ones), but when I looked at that tree, all I could see was love.  It meant more to me than I can ever say!

Today, I am Thankful...God has given me another year to love my family!

FYI...Yes, I do still hoard scrapbook supplies!  I'm convinced there's not a cure for that either! :-)

Thank you for stopping by!  I'd love to have you join my blog and leave a comment!!!

Friday, October 26, 2012

Thoughts On Cyber Bullying & A Card For You!


Hello Everyone...
Amazing how quickly time passes, isn’t it?  When I created my blog, I vowed to post my artwork and some quick little tutorials on a regular basis.  As much as I would love to create something everyday, Lupus & Scleroderma has stolen my ability to do so. Because of so many of you, I am able to continue my passion for scrapbooking while living vicariously through scrapbook videos, blogs & facebook groups.  I appreciate the time and effort that goes into every video.  I realize that some of you have recently become discouraged due to cruel & heartless cyber bullying.  While some of this may be attributed to petty jealousy and total lack of self control. There will always be a few who take great joy in negative attention. 
I want to thank every one of you for touching my life and thousands of others from all over the world.  Hugs!
Okay, time to share a cute little card I made just for you!  For a vintage look, craft paper was my choice for the base.  Simply can't get enough of Prima's Fairy Belle Paper Collection, by the very talented Jodie Lee! http://www.etsy.com/shop/jodieleedesigns?ref=seller_info_count
How fun is it to use Glimmer Mist and Tim Holtz Distress Inks to dye your seam binding and other fabrics to match your paper, also perfect for those little butterfly paper punches!  Bet you'd never guess that the metal key and heart are from Marion Smith's Prima Trinket Collection??? http://www.marionsmithdesigns.com  For those of you who love to alter metals...Have you tried using Pearl Alcohol Inks, Gesso and your heat gun?  (For your safety, please place your items in a tin pie plate)...we don't want a fire.  The distressed rust color is the burned alcohol ink, isn't it awesome!!!  Once your metal has cooled down, it's a good idea to spray it with a sealant.  I can't tell you how much I love this look!  If you're into shabby chic, you will too!  The little frame is from Crafty Secrets, the dressform and tiny flowers are from Maya Road, the beautiful little vintage girl is from MadebyJanet on Etsy, the sentiment stamp is from Stampin Up and the trim is from JoAnn Fabrics!
Please remember to give your favorite you tube artist's a little extra love & hugs!  As always, thanks so much for stopping by! Would love to have you join my blog and leave a little comment! Hugs!!!

Saturday, October 6, 2012

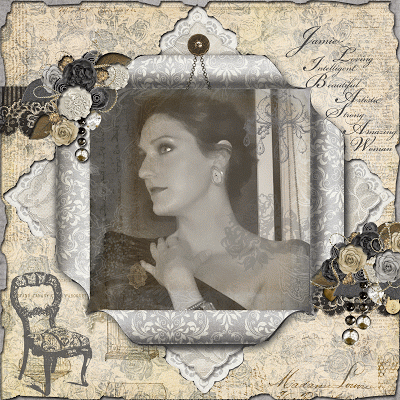
Vintage Glamour!

Sadly, several months ago my laptop which contained all of my digital art, died.  I wasn't too worried as I had Carbonite.  I knew I would be in for a lot of work transferring everything to a new computer but in the end, it would be okay...wouldn't it?  It wasn't the first laptop to die on me.  I had certainly been through this before.  Actually, I'd had two other laptops backed up with Carbonite.  What I didn't realize was... this was completely different.  I had the usual C drive but also had a G and an F drive, which was where I stored most of my digital stuff.  Carbonite backed up my C drive and that was about  it.  In the fine print, it says you should tell them exactly what you want backed up.  I'd known for a few weeks that my computer wasn't feeling well and had started making CD's of some of my digital art but believe me, it wasn't close to what I'd had.  May I just say, lesson learned!

I've been a Prima fan for a long time and absolutely love Jodie Lee's designs.  I've recently become aware of her digital designs which can be found on Facebook at Gypsy Chick Designs. In this layout I've used paper and brushes from the French Market Collection,Vintage Brush Club Collection and Vintage Photo Textures Collection. Also used were embellishments, paper and a frame from The Shabby Blanc Collection, designed by Brandy Murry and embellishments from Crafty Secrets Digital Designs.

This photo of my daughter, Jamie has such a vintage feel to it, I couldn't wait to design a layout around it!

Tuesday, October 2, 2012

Spooktacular Halloween Mini Album!

It's finally Fall!!!  My very favorite time of year!  I absolutely love sweatshirt weather, watching the leaves change into their gorgeous Fall colors, collecting apples and watching Husker Football.  I also love Halloween Scrapbooking.  The paper collections are absolutely gorgeous.  I find it impossible to work with just one collection.  I began working on an album last year, decided to put it away until this season and have finally finished it!  It is definitely an eclectic, over the top, tons of fun album!

Front and back cover- Graphic 45 Paper, Prima Flowers, Jolees Pumpkins, Tim Holtz Keyhole painted, 7 Gypsies Glass Knob and Cheese Cloth dyed with Glimmer Mist.
 Pg. 2&3 Paper- Recollections, Fancy Pants, Basic Gray, Cricut Happy Hauntings Cartridge, Stickles, Belinda Akers Embossed Foil Tags, Recollections Stickers, Rosette Trim- Hobby Lobby, Inkadinkado Stamps painted with Glimmer Mist, Brads- My Minds Eye, Martha Stewart Fence Border Punch, Iamroses Gardenias, Prima Leaves, Sizzix Corner Flourish Die, Fall Berries Garland By Ashland

Pg. 4&5 Paper- Recollections, Tim Holtz Halloween Stamp, On The Edge Die, Crafty Secrets Calendar, Making Memories Metal Charms, Tab Punch Stampin Up, Prima Flower & Bling Center, Sizzix Corner Punch, Spider Web Punch Martha Stewart
Pg. 6&7 Paper- Authentique, Skeleton Images from the Internet, Tim Holtz Grunge Board Book Plate, Inkadinkado Stamp, Spider Clothes Pin- Celebrate It, Skeleton Hand- Celebrate It, Burlap- Michaels, Elastic Organza Ruffle- Hobby Lobby, Cameo- Gabrielle Pollacco- Bo Bunny, Haunted Mansions- Cricut Cartridge, Mansion Images from Internet, handmade Lollipop Flower, Prima Flowers.
Pg. 8&9 Paper- Authentique, Glitz Design, Handmade Flower topped with Prima Flower, Cricut Cartridge- Chandelier, Half Backed Pearls- Recollections, Inkadinkado Stamp, Martha Stewart Punch.
Pg. 10&11 Paper- Recollections, Graphic 45, TPC Studios, Pinkpaislee, Fancy Pants, Moxxie,  Tim Holtz Ornate Die- Large & Small, Cuddlebug Embossing Folder, Sizzix Frame Die, Melissa Frances Resin Frame, Prima Trinket Blackbird, Bead Landing Clock Hand, Prima Junkyard Finding Gear, Prima's Marion Smith Metal Flowers hammered, painted & heated, Inkadinkado Stamp, Cricut Cartridge Frame & Coffin, Moxxie Skeleton Sticker, Canvas.
Pg. 12 Paper- Cover of Flip Album- Glitz Design, Seam Binding dyed with Glimmer Mist.
Flip Album Pages Stamped, Glimmer Misted and inked with Tim Holtz Distress Ink. Designer Papers include- Authentique, We R Memory Keepers, Graphic 45, TPC Studios, Recollections.


Would love to see your Halloween creations!  Thanks so much for stopping by!  Would love it if you'd leave a comment!

Friday, September 28, 2012

Prima Scrappy Happiness!!!

Here's a fun layout designed by Prima Educator, Jamie Dougherty!  I love her "Live With Prima" classes on Ustream!  Recently, Jamie suggested that we create a layout using her design taught in class.  We were asked to post our finished version on the "Live With Prima" Facebook page by the 30th.


I had so much fun creating this page, especially since I've been anxious to work with gesso and the new stencils that have become so popular again.  Remember the days when we stenciled everything we could get our hands on, ladies?   Have to admit, this is tons of fun and so easy...You really can't make a mistake!  Perfect when you're needing to add a little texture to your project or even mute the pattern on your paper.  To add a little elegance I sprayed the dried gesso with Glimmer Mist in both gold and silver!  I didn't have Prima's Songbird paper line, which was what Jamie used, so I decided to substitute with Prima's Rondelle and a 6x6 paper pad of the Almanac paper line, which happened to be what I had on hand.  I also used Prima Flowers and Trinkets to complete my page.  The adorable ruler pieces are from Maya Road...Aren't they cute!

As always...Thanks so much for stopping by!  Would love to hear from you!!!

Sunday, August 12, 2012

Finding Inspiration From The Unexpected!

What inspires you?  How about a pair of hippie earrings (not pictured here), cheese cloth and a desire to create a Bohemian style layout. My daughter is studying Fashion Design and specializing in Knitwear!  I loved the way her scarf looked with the cheese cloth.  Funny, I remember making the scarf a few years ago...The name of the yarn- Bohemian! :)  Guess I'm not sure how all of these things came together but I'm always happy when it's finally time to create my "off the wall" vision!
By adhering the layout to an Artist Canvas Board, my daughter will be able to place this in an easel or hang it on her wall.  To achieve this look, I simply painted the sides with black acrylic paint, stamped a flourish image with Versa Mark Embossing Ink and dabbed Perfect Pearls in Gold over the ink, gently brushing the excess away. I finished with a spray matte polyurethane sealant.

Prima goodness is all over this page, thanks to my local scrapbook store, Pages In Time / Purses and More!  I was able to grab Prima papers from the Melody, Moulin Rouge and Sparkling Spring Collections.  Other Papers used, FabScraps- Classic Flower & Classic Black Lace, Crate Paper- Restoration Doilies Collection! Additional Supplies- Prima Botanical Notecards, Prima Flowers, leaves & Bling, Prima's Marion Smith's- Vintage Trinket Metal Flowers & Bling Dangles, Petaloo Flowers, Spellbinders Dies, EK Success Punch, Fiskars Punch, Sizzix Flourish Die, Natural Unbleached Cheese Cloth, Black Chain, Brooch and Beaded Dangles made by myself, Corrugated Cardboard, 12x12 Canvas Board, Tim Holtz Distress Inks, Fabulous Flourishes Stamps and Perfect Pearls, Versa Mark Embossing Ink, Tattered Angels Glimmer Mist, Black Acrylic Paint, DecoArt Dazzling Metallics Elegant Finish Paints, Rub'n'buff Ebony, Transparencies with Sentiments made with Photoshop Elements.

As always...Thank you so much for stopping by!  Would love to hear from you!!!

Thursday, July 26, 2012

Scrapping With Transparencies and Canvas!

Don't you love the way photos look printed onto a transparency? Ever thought about using canvas as a background?  How about starting small?  Sound do able?...Completely!  Start with a fav photo, something without tons of intricate detail. Before printing, tell your photo editor to revert image- (simply flips the photo).  I do this so that the ink will be on the underside, once its out of the printer and I've turned it over to it's correct orientation.  This protects my photo so I don't have to worry about the ink getting scratched.  As for the canvas...Couldn't be easier!  I picked up a small covered canvas board at Hobby Lobby.  I then purchased some canvas by the yard at JoAnn Fabrics.  Cut it to size, leaving a small amount to fray the edges until you achieve the desired look.  Apply your fabric canvas to your canvas board using Fabri-tac.  Now decorate!!!

Prima Flowers, Silver Locket- Michaels, Pull Knob- 7 gypsies, Keyhole- Tim Holtz, Bling Button- JoAnn Fabrics, Vintage Seam Binding- Etsy, Flourish Bling- Prima, Crotchet Flower and Beaded Dangle- Made By Me!
Thanks so much for stopping by!  Happy Scrapping!!!

Tuesday, July 24, 2012

My Favorite Vintage Lady Card! :)

Do you have a favorite card or layout?  Something that you've created that you just can't part with?  It's okay, you can admit it! :)  I know, we all have good intentions.  We want to make something special for that special someone and before we know it, we've created a little piece of ourselves, that has found it's home with us!  If you think about it, your artwork is a part of you and should be enjoyed by you and one day by your children.  So next time you're feeling guilty, stop, enjoy your little creation and know that your children might one day be doing the same! 
Background Paper- BMU Shabby Blanc Newsprint Digital, Kraft Cardstock- JoAnns, Book Script Digital Paper (printed and cut out)- Katie Pertiet- Designer Digitals, Diamond Pattern Paper- Websters, Dressform- Dusty Attic, Frame- Tattered Angels, Spools- Maya Road,  Half Back Pearls & Button Trim- Hobby Lobby, Porcelain Roses- Michaels, Vintage Seam Binding- Etsy- Debbie Marcinkiewicz, Vintage Lady Image- Etsy- madebyjanet, Fabric Flower- Prima, Stickpin- made by me!

Thursday, July 19, 2012

Little Darlings Album! Made For Baby Sully!


If you're looking for a perfect vintage paper line for either a layout or a mini for a baby...Look no further! G-45 has outdone themselves with their Little Darlings Paper Line! I loved being able to use the paper from the line as well as odds and ends from my stash- both paper and digital, which I was able to print. It all matched perfectly and with enough left over to make a few more minis for all 4 girls!


I cut my Onesie Pattern from my Baby Steps Cricut Cartridge. I then traced my pattern onto med wt. chipboard, cutting them by hand. The patterned paper was cut with the Cricut.  I covered my first piece with a cute little vine pattern by WE R Memory Keepers...Loved how it incorporated all of the colors I'd had in mind for my album! Couldn't resist their dimensional stickers either...They added so much to this album!  I used several Spellbinders dies as well as Stampin up & Martha Stewart  Punches too! I even used some printed digital papers from the SNU Baby Line and BoBunny & October Afternoon Papers from my stash. The Baby Steps Cartridge was fun to play with. I found myself cutting the crib in several layers & embossing it to make it look like a dark wood finish.  Loved the Little Darling Chipboard Pieces & Stickers. The child kneeling in prayer was a Crafty Secrets Vintage Image. Of course, everything vintage must have seam binding! Also used ball trim, twine and ribbon from Hobby Lobby. The wooden frame is from Dusty Attics. Everything is distressed with Tim Holtz Inks! Used some Tim Holtz metals also and my favorite Bird Cage Die!   The Binding was done with the We R Memory Keepers large eyelets in copper and a 7 gypsies med binding ring!  Lastly, the back cover pic was taken while in the NICU. Baby Sully is holding his Daddy's hand. I found the poem and knew it was perfect!
Thanks so much for stopping by!

Blog Design by Get Polished